2 Shots a minute. 25 Minutes a day. 5 Days a week. 2 Months of the year (July & August). 4 weeks in July & 5 Weeks in August. Total Shots taken for the Summer... 2250.
Clear a 10X10 ft. space in your backyard or driveway (get your parents permission first), and set up your own personal Shooting range. All you need is a street hockey goal, but even spray paint and a pad or sheet of plywood (to serve as the target) will do. Several products can be purchased online as the surface to shoot off of, but I have always found that pieces of boards, glass or dasher taken from the scrap heap of rinks work just fine. As long as the surface is flat, and provides a gliding surface, your shooting board can be created with almost zero financial outlay. 10 pucks and your favorite stick are the only other tools you'll need.
Once the range is set up, it's time for you to go to work. Set goals for yourself, including minimum time, types of shot, and targets to hit, so that you can exceed your ability rather than settling for the path of least resistance. I always found that bringing friends into the mix can create a level of competitiveness that brings the best out of the both of you.
Use a golf ball to warm up your hands before shooting (60- 180 seconds), and pump out body weight (push ups or chin ups) or resistance exercises before and after shooting, to complete your program and strengthen your arms and shoulders. Wear your hockey gloves when shooting, and most of all... DON'T FORGET YOUR BACKHAND!!!!

Monday, March 28, 2011

Wednesday, March 9, 2011
BOSU Ball Training for Improved Hockey Balance

The BOSU ball is a very effective tool for hockey players. It allows them to enhance their balance, core strength and even power. By inserting several exercises with the ball into their regimen, hockey players of all levels will be better prepared to turn on a dime and make explosive moves without losing their balance. As we have discussed in my earlier article on dynamic edge control, being able to balance and maximize your power capabilities will make you a more explosive skater. It also will benefit you when you are handling the puck under duress.
The following exercises should be essential for every hockey player, and can be easily added to an existing weight training program, because they strengthen essential muscle groups that are difficult to strengthen in controlled exercises. Try these three, and do so by adding 1 a day to your current strength training program.-
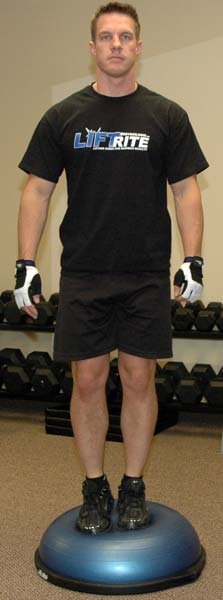
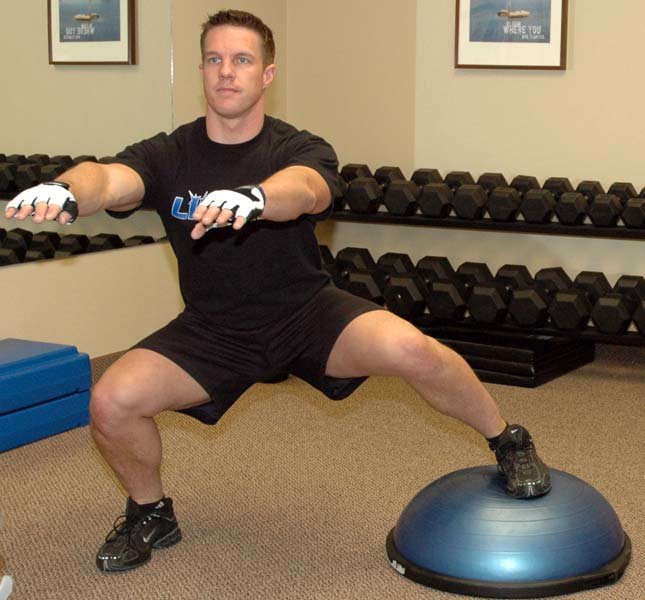
Side To Side Lunges:
This exercise is done with the flat portion of the BOSU ball on the ground. Start with both feet on the ball. Take your right foot out and into a side lunge, then explode up, replace your left foot with your right, and repeat on the opposite side. Do three sets of 8-10 reps for each leg.
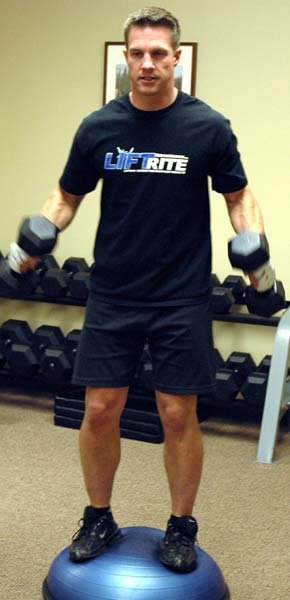
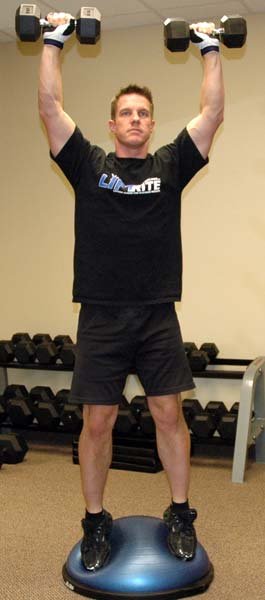
Squats With Overhead Press:
This exercise should only be advanced to when you feel comfortable with basic squats. Take a pair of dumbbells, about half of the weight of your sitting shoulder press weight, and hold them at ear level as if you were about to perform dumbbell presses for the shoulders.
When you push back up on the squat press the dumbbells overhead and make sure you keep your back straight. 8-10 repetitions and 3-4 sets should be performed although you may need to take an additional minute of rest after working two muscle groups together.

Push-Ups:
This exercise is performed with the bubble side down. Place your hands on the outer edges making sure they are directly under your shoulders. Keep a flat back and tighten your abdominals throughout the workout.
Descend until your chest is very close to the platform, and then slowly push back up. Perform one set until you cannot go any more, making sure to keep proper form the entire time. Once you complete your first set, rest for one minute, and repeat. Try 3 sets to failure.
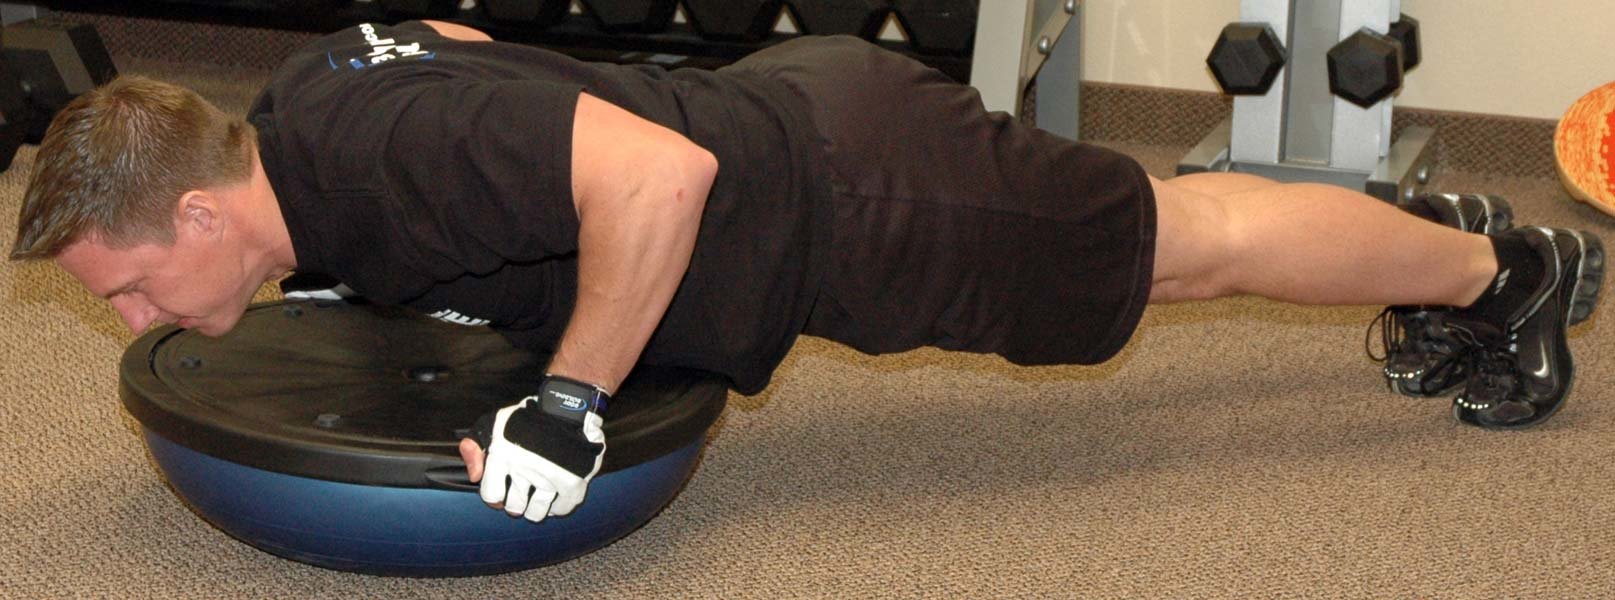
If you incorporate these exercises you will greatly improve your balance and functional athleticism. Incorporating these activities into your current weight training program will be an exciting challenge, and you will be amazed by the dramatic results!
Some text and pictures were provided by- http://www.bodybuilding.com/fun/wotw78.htm
Monday, February 28, 2011
Improve Puck Control- Off- Ice
One of the first things that I try to teach all my athletes, in particular my high school kids, is that you do not need ice to improve your hockey skills.
I am going to challenge my players this off-season to make their puck handling abilities the best they have ever been without even stepping onto the ice.
Make a goal of taking 10-15 minutes, 3-4 times per week to practice the following
exercises-Exercise 1: Very simply lay down two bricks and lay the broomstick or a piece of wood across the bricks forming a tunnel. Only one rule, be creative. Move the ball around the bricks, under the wood or over the wood. Jump over the wood on two feet or one foot, to improve total body training. Try to move as fast as you can and try to move the ball as fast as you can. Be sure to use your forehand, backhand, toe drag and more. Remember be creative and have fun. Start with sets of 30 seconds and work your way up.
Exercise 2: This exercise will require a partner. You will need the broomstick, ball and hockey stick for this drill. Your partner starts by dragging the far end of the broomstick across the ground. Drag the stick in a half circle trying to keep the same pace. As your partner moves this stick your job is to move the ball around the broomstick without letting the broomstick touch the ball. You can do this by moving the ball under the broomstick, by using the toe drag to pull the ball back towards you out of the reach of the broomstick or even by lifting the ball up and over the broomstick. Once again practice using your forehand, backhand and toe drag. Keep your head up and practicing being quick. To make the exercise more difficult allow your partner to move the broomstick as he/she wishes instead of at a set pace.
Exercise 3: The Obstacle Course. You can use pucks or cones or any type of obstacle you like for this drill. Set the obstacles up in any fashion you like but I would recommend that you start with a straight line. Practice moving the pucks through the obstacles while moving as fast as possible. You can practice going around the obstacles with your whole body or practice keeping your body in between the obstacles and just moving the ball around the obstacles. Practicing on forcing the puck as wide as possible. Work outside your comfort zone. Practice using only one hand when going wide on your backhand. Be sure to keep your head up and work on moving as fast as possible.
In addition to being creative and utilizing different drills, there are an amazing amount of tools to help you improve your puck control skills off the ice. Some of these include-
1) Golf Balls- improves fast-twitch muscles and reflexes.
2) Puck Socks- You can purchase these online or in pro-shops. They are a sleeve that fits over the shaft of your stick and allows your to add weight to your stick. Great way to build up strength.
3) Tennis Balls- Improve athleticism, hand-eye coordination, and reaction time, by dribbling a tennis ball up and/ or down with your stick.
4) Wrist Rollers- Great for strengthening your forearms, and a very easy tool to make. All it requires is a rope, 24' stick or bar, and a weight (5-10lbs). Roll it up and back down to develop forearm and hand strength.
If you work 10-15 minutes, 3-4 times per week from now till next season, you will greatly develop your puck skills, and in the process never even have to pay for a lesson, ice time, or entry fee. All the tools are at your disposal. Give it a try and see what happens.
Monday, February 7, 2011
Out of Comfort Zone Skating- Part 1
Dynamic Edge Control- http://www.youtube.com/watch?v=JdyXZPH6XTw&feature=related
Whether you are an experienced skater or not, you are aware that a strong grip against the ice is necessary for balance, speed and power. You get this grip by using the edges of your blade, shifting your weight onto the outside or inside. Dynamic edge control is vital to achieve quick starts, explosive turns, puck possession mastery, and rock-steady balance. This article will explore some of the basic mechanics and technical aspects of edge control, and give some unique drills that explore C-Cuts and balance in ways that many coaches have never tried.
Whether you are an experienced skater or not, you are aware that a strong grip against the ice is necessary for balance, speed and power. You get this grip by using the edges of your blade, shifting your weight onto the outside or inside. Dynamic edge control is vital to achieve quick starts, explosive turns, puck possession mastery, and rock-steady balance. This article will explore some of the basic mechanics and technical aspects of edge control, and give some unique drills that explore C-Cuts and balance in ways that many coaches have never tried.
COUNTERBALANCE
As you can see from the video above, to get the most out of your edges it is vital that you work on being able to roll your ankles each way to an angle of 45 degrees.
Believe it or not, when attempting to improve your skating, falling down is an extremely beneficial tool. It shows you exactly when you have gone too far and where you have lost control. This is commonly known as out of comfort zone training.
Thus, it is very important that you begin to use your edges the way they were intended. To do this, you will definitely need to have an understanding of what I like to call Counterbalance.
Counterbalance, in skating terms, means to shift your upper bodyweight in the opposite the direction of your edges. For example, when edges roll properly in one direction, you must counter this action by shifting your upper bodyweight in the opposite direction (still keeping your shoulders level and parallel with the ice).
If you lean too much of your upper bodyweight in the same direction as your edge and the angle of the edge becomes too extreme, it will almost certainly slip out from under you and cause you to lose power or fall down.
THE OUTSIDE EDGE:
Most important for dynamic edge control is where you place your bodyweight over an edge that holds the key to how it will perform for you. And, quite often it is the upper part of the body that is creating the most problems for you …especially when it comes to the outside edge.
Of the two edges, the outside edge, rolled halfway to the ice at the proper 45 degree angle (or more), is a more difficult edge to lay down in the ice. In order to get on an outside edge, you must have the confidence to be able to roll your ankle outward…and turning the ankle out is a much less natural movement than turning the ankle in.
Body Positioning:
Body Positioning:
Is your ankle going to cave in? If you feel like this, then it is more likely than not that you are forcing too much weight on one side of the edge.
Instead, when you put the outside edge down in the ice, it is important that you have your hips and knees move past the edge and toward the ice. But at the same time you will want to counter that push in with the lower body, by maintaining your upper body as parallel with the ice as you possibly can.
As you gain more confidence and improve using the outside edge, you will be able to push the edge harder and with more consistency, and the way you adjust your body will become more natural. When you get to this point, you know that your muscles are beginning to learn the lessons that you are teaching them… this is called “muscle memory.”
Placement of the Blade on the Ice:
Instead, when you put the outside edge down in the ice, it is important that you have your hips and knees move past the edge and toward the ice. But at the same time you will want to counter that push in with the lower body, by maintaining your upper body as parallel with the ice as you possibly can.
As you gain more confidence and improve using the outside edge, you will be able to push the edge harder and with more consistency, and the way you adjust your body will become more natural. When you get to this point, you know that your muscles are beginning to learn the lessons that you are teaching them… this is called “muscle memory.”
Placement of the Blade on the Ice:
How you place any edge on the ice is a vital factor in your ability to use it efficiently. This is especially true in regards to the outside edge, where you have less margin for error than on the inside edge.
To help you better understand where and how to put the skate properly down on the ice, it is good to think of the blade as three separate parts: Front-Middle, Middle-Middle and Back-Middle. Given these terms, think of the blade divided into 3 sections.
You will use all these parts of the blade depending on what skating maneuver you are doing. For example, a quick start comes from the front-middle of your blade. As well, a quick turn in a short area (especially at lower speeds) can come from the back-middle or back third of the blade.
But for the best success in improving and holding an outside edge, you will want to use the middle-middle of your blade. This gives you the most stability, strength and control.
Try this by building up speed around a circle and then glide only on your outside edge (one foot). Place the skate down incorrectly, with too much weight toward the toe, and you will see how this will cause you to come off the edge and lose your balance forward.Then, skate around the circle again and this time land the outside edge correctly in the middle of the blade getting as much of it as possible in contact with the ice and it should be clear to you where the most stability will come from…. directly in the middle of the blade.
UNIQUE DRILLS
UNIQUE DRILLS
1) Puck C-Cuts- To develop dynamic balance after learning the basics, try this drill. Gain a slight amount of momentum heading up ice, then step on a puck, using the middle of your blade, with one leg. Assert your balance and stabilize yourself. Then to propel yourself, use the forward C-Cut with the opposite leg to power yourself down the length of the ice. After trying with one-leg, try again with the other. At first this drill will feel impossible, but as you gain confidence, you will be able to GAIN a tremendous amount of speed and also develop the stability muscles within your legs that allow elite players to maintain control of the puck at top speed while dekeing and/ or being checked.
2) Horsepower Circles- Tell your kids to look a thoroughbred, and ask them why they think the horse is so fast? I'm sure you will get some strange answers, but once the kids realize its the gigantic muscles located in the horses rear thighs and butt, they will be able to visualize the horses power. To focus on developing these muscles, make the kids do all 5 circles, starting out of the corner, with no sticks and with their gloves constantly touching the ice. This drill focuses on perfect inside and outside edge control, leg drive and placement, and dynamic power pushes.
3) 1-Legged C-Cut Propulsions- Have your players start at the goalline and instruct them to (with one leg) propel themselves down the ice without ever taking a stride. Can't be done? With one leg you can C-Cut inside, then outside, then back to inside, then back to outside and so on... propelling yourself down the length of the ice and gaining a tremendous amount of speed and momentum. Oftentimes I call this the ballerina drill. It takes balance, power, form and technique to sustain the movement, and will drastically improve confidence.
Wednesday, January 26, 2011
Breaking Habits to Achieve Success- Part 2
Developing Fast- Twitch Muscle Fibers for Hockey-
Are you a better sprinter or distance runner? Many people believe that having more fast and slow twitch muscle fibers may determine what sports athletes excel at and how they respond to training.
Skeletal muscle is made up of bundles of individual muscle fibers called myocytes. Each myocyte contains many myofibrils, which are strands of proteins (actin and myosin) that can grab on to each other and pull. This shortens the muscle and causes muscle contraction. It is generally accepted that muscle fiber types can be broken down into two main types: slow twitch (Type I) muscle fibers and fast twitch (Type II) muscle fibers.
These distinctions influence how muscles respond to physical activity, and each fiber type is unique in its ability to contract and reflex in a certain way. On average, we have about 50 percent slow twitch and 50 percent fast twitch fibers in most of the muscles used for movement.
Slow Twitch (Type I)
The slow muscles are more efficient at using oxygen to generate more fuel (known as ATP) for continuous, extended muscle contractions over a long time. They fire more slowly than fast twitch fibers and can go for a long time before they fatigue. Therefore, slow twitch fibers are great at helping athletes run marathons and bicycle for hours.
Fast Twitch (Type II)
Because fast twitch fibers use anaerobic metabolism to create fuel, they are much better at generating short bursts of strength or speed than slow muscles. However, they fatigue more quickly. Fast twitch fibers generally produce the same amount of force per contraction as slow muscles, but they get their name because they are able to fire more rapidly. Having more fast twitch fibers can be an asset to a sprinter since she needs to quickly generate a lot of force.
Both types of muscle fibers are extremely important for hockey players to develop in several critical areas of their bodies, particularly in their legs. Weightlifting, stairclimbers, eliptical machines, bicycling, and long distance running, can build the slow twitch muscle fibers needed for game-long hockey endurance. A dedicated conditioning program focusing on sprints, plyometrics and box exercises can develop fast-twitch muscle fibers off the ice. With consistent endurance training, muscle fibers can develop more and improve their ability to cope with and adapt to the stress of exercise. Yet, how can we develop these fast-twitch fibers on the ice?
Activities that create a Sense of Urgency-
Players will build up and develop these fast-twitch muscle fibers when they are forced to "activate" rapidly. Casually skating, in any direction, will never develop a player into an elite skater. Top players (NHL, Div. 1 NCAA, CHL) can get to top speed after their 3rd step. Quick starts. Only racing, battling, or out of comfort zone training will develop the fast-twitch muscle fibers that can make an elite powerskater. Try these activities when working with players who need to improve their quicks starts and reaction time. All these activities will take them out of their comfort zone, create a sense of urgency, build fast-twitch muscle fibers, and accelerate their ability.
1) Ladder Training With a Tennis Ball-
Space sticks on the ice, 12-16 inches apart, to create a 3 or 4 level ladder. Each space should represent a quick start stride. Oftentimes, novice players will worry about falling down when performing this activity, and in the process defeat the purpose of the activity and stay within their comfort zone. To beat this mindset, place a coach at the end of the ladder, about 5 feet away from the final stick, and instruct the player that when the begin their first step, the coach will release a tennis ball into the air and they will need to catch it. The drill will create an immediate sense of urgency.
2) Ladder Training with stick swings-
Using a ladder once again and drilling down into the quick start once more, have players use high-knee crossovers up the front of the ladder and back down the ladder for one full repetition of the drill. Then they will need to turn into a V-position quick start and race through the ladder for completion. Yet, at the end of the each high-knee rep, after the last stick in the ladder, have a coach swing his stick underneath the players legs (as they leap over it). This drill will create an immediacy, and force players to learn additional balance and recovery skills that they wouldn't use with a traditional ladder drill.
3) Resistance Bands or Resistance Pulls-
Have players perform drills (forward/ backward skating, high-knee crossovers left & right, powerskating and edge control drills) at top speed while pulling another player. You can use their sticks for this or, what I prefer, resistance bands or bike inner tubes.
4) Golf Ball & Weighted Puck Stickhandling-
Use a golf ball, on or off-ice, to stickhandle. With your head up, gloves on, and covering the entire surface area (to your left, right and directly in front of you), rapidly dribble the golf ball. This will greatly improve your reaction time to pucks, hand speed, eye-hand coordination, and enhance fast-twitch fibers in your forearms. Using a weighted puck on the ice to do similar drills will greatly improve your ability to puck handle in both controlled stickhandling situations, and rapid, dribbling situations.
As with any drill, be creative, have fun, and encourage high-tempo. Make sure, as a coach, you reinforce the importance of form and technique so that players do not develop improper muscle memory.
Are you a better sprinter or distance runner? Many people believe that having more fast and slow twitch muscle fibers may determine what sports athletes excel at and how they respond to training.
Skeletal muscle is made up of bundles of individual muscle fibers called myocytes. Each myocyte contains many myofibrils, which are strands of proteins (actin and myosin) that can grab on to each other and pull. This shortens the muscle and causes muscle contraction. It is generally accepted that muscle fiber types can be broken down into two main types: slow twitch (Type I) muscle fibers and fast twitch (Type II) muscle fibers.
These distinctions influence how muscles respond to physical activity, and each fiber type is unique in its ability to contract and reflex in a certain way. On average, we have about 50 percent slow twitch and 50 percent fast twitch fibers in most of the muscles used for movement.
Slow Twitch (Type I)
The slow muscles are more efficient at using oxygen to generate more fuel (known as ATP) for continuous, extended muscle contractions over a long time. They fire more slowly than fast twitch fibers and can go for a long time before they fatigue. Therefore, slow twitch fibers are great at helping athletes run marathons and bicycle for hours.
Fast Twitch (Type II)
Because fast twitch fibers use anaerobic metabolism to create fuel, they are much better at generating short bursts of strength or speed than slow muscles. However, they fatigue more quickly. Fast twitch fibers generally produce the same amount of force per contraction as slow muscles, but they get their name because they are able to fire more rapidly. Having more fast twitch fibers can be an asset to a sprinter since she needs to quickly generate a lot of force.
Both types of muscle fibers are extremely important for hockey players to develop in several critical areas of their bodies, particularly in their legs. Weightlifting, stairclimbers, eliptical machines, bicycling, and long distance running, can build the slow twitch muscle fibers needed for game-long hockey endurance. A dedicated conditioning program focusing on sprints, plyometrics and box exercises can develop fast-twitch muscle fibers off the ice. With consistent endurance training, muscle fibers can develop more and improve their ability to cope with and adapt to the stress of exercise. Yet, how can we develop these fast-twitch fibers on the ice?
Activities that create a Sense of Urgency-
Players will build up and develop these fast-twitch muscle fibers when they are forced to "activate" rapidly. Casually skating, in any direction, will never develop a player into an elite skater. Top players (NHL, Div. 1 NCAA, CHL) can get to top speed after their 3rd step. Quick starts. Only racing, battling, or out of comfort zone training will develop the fast-twitch muscle fibers that can make an elite powerskater. Try these activities when working with players who need to improve their quicks starts and reaction time. All these activities will take them out of their comfort zone, create a sense of urgency, build fast-twitch muscle fibers, and accelerate their ability.
1) Ladder Training With a Tennis Ball-
Space sticks on the ice, 12-16 inches apart, to create a 3 or 4 level ladder. Each space should represent a quick start stride. Oftentimes, novice players will worry about falling down when performing this activity, and in the process defeat the purpose of the activity and stay within their comfort zone. To beat this mindset, place a coach at the end of the ladder, about 5 feet away from the final stick, and instruct the player that when the begin their first step, the coach will release a tennis ball into the air and they will need to catch it. The drill will create an immediate sense of urgency.
2) Ladder Training with stick swings-
Using a ladder once again and drilling down into the quick start once more, have players use high-knee crossovers up the front of the ladder and back down the ladder for one full repetition of the drill. Then they will need to turn into a V-position quick start and race through the ladder for completion. Yet, at the end of the each high-knee rep, after the last stick in the ladder, have a coach swing his stick underneath the players legs (as they leap over it). This drill will create an immediacy, and force players to learn additional balance and recovery skills that they wouldn't use with a traditional ladder drill.
3) Resistance Bands or Resistance Pulls-
Have players perform drills (forward/ backward skating, high-knee crossovers left & right, powerskating and edge control drills) at top speed while pulling another player. You can use their sticks for this or, what I prefer, resistance bands or bike inner tubes.
4) Golf Ball & Weighted Puck Stickhandling-
Use a golf ball, on or off-ice, to stickhandle. With your head up, gloves on, and covering the entire surface area (to your left, right and directly in front of you), rapidly dribble the golf ball. This will greatly improve your reaction time to pucks, hand speed, eye-hand coordination, and enhance fast-twitch fibers in your forearms. Using a weighted puck on the ice to do similar drills will greatly improve your ability to puck handle in both controlled stickhandling situations, and rapid, dribbling situations.
As with any drill, be creative, have fun, and encourage high-tempo. Make sure, as a coach, you reinforce the importance of form and technique so that players do not develop improper muscle memory.
Monday, January 10, 2011
Breaking Habits to Achieve Success
Stepping Out of Your Comfort Zone
Humans seem wired to seek comfort, and as a result much of daily life is focused around familiar patterns and habits. The grind. When a condition threatens to break those habits, we, oftentimes, feel uncomfortable and nervous. These negative feelings are easily avoided by continuing to live life the same way, rejecting change. If given the chance to enter uncharted territory, a situation where life’s future is unpredictable, people often prefer not to change, clinging to a comfortable situation, not matter whether it is good or bad for them. If we cling to familiarity in these aspects of our lives, there’s no opportunity for real growth — personally, professionally, or athletically.
This is particularly true in the sport of hockey. Ice Skating is an unnatural act that takes years of practice. The athletes who demonstrate the greatest eagerness to abandon fear of injury at a young age will often be the athletes who have the fastest, most dynamic learning curve.
As a coach, I believe all activities should be made competitive, and exciting. Each drill or activity should have several different variables that incorporate several layers of instruction and practiced athleticism. For example... Who teaches crossovers by teaching kids to skate all 5 circles? Everyone does. It's a basic hockey drill. From mites on, kids start in the corners and skate the circles 3 players at a time. Forwards then backwards. Yet how many times in a game do you actually crossover for an entire 360 degrees? And isn't the most difficult part of the movement, not the crossover itself, but rather the transition from crossover left to crossover right... from crossover forward to a stop or tight turn.... the transition from crossover forward to backward skating. The 5 circles is a basic hockey drill that every bored coach does, and past Pee Wee's we as coaches need to ask ourselves what does it really do? Does it re-inforce bad habits and keep kids in their comfort zone? Or does it challenge them to think outside the box?
Try this idea. Use the helpful hints from this Youtube video from the Canadian Hockey Academy and incorporate them in what I call the "Peanut Drill"- http://www.youtube.com/watch?v=EZnfktIar_o
To perform the peanut drill, take 6 cones and place them in neutral ice in the shape of a peanut. The 4 end cones should be equally wide from one another, and the 2 inner cones should be narrow, about 5-7 feet apart. Your peanut can vary in size depending upon whether you are dealing with a team or in a private lesson environment. Divide your group in half, with half the group skating around the shape of the peanut (outside the wide end cones, and up inside the narrow inner cones), and the other half skating in the opposite direction in a wide crossover 5-10 feet outside the peanut. Instruct your players navigating the peanut that during the drill they should not have any traditional forward strides, and they should be able to generate speed off their edges, by continuously crossing over. On your whistle players will speed up. On 2 quick whistles they stop and change directions. 3 quick whistles they turn around into a back skate. Incorporate pucks to build skill upon skill, and have the groups switch after 3-5 minutes. During the switch demonstrate proper technique and drill down with demonstration what skills are being performed correctly.
Is this a more game-like activity? Does it force players to keep their head up, and multi-task skills? Yes. Is it easy to set up and teach? Absolutely.
On this blog, and through my website, I hope coaches of all levels and ability can have some insight into some of the principles that I have learned in my playing career and through my many years of coaching. Feel free to contact me anytime with questions and comments, as I will be frequently posting.
All the best,
Andrew Trimble
Humans seem wired to seek comfort, and as a result much of daily life is focused around familiar patterns and habits. The grind. When a condition threatens to break those habits, we, oftentimes, feel uncomfortable and nervous. These negative feelings are easily avoided by continuing to live life the same way, rejecting change. If given the chance to enter uncharted territory, a situation where life’s future is unpredictable, people often prefer not to change, clinging to a comfortable situation, not matter whether it is good or bad for them. If we cling to familiarity in these aspects of our lives, there’s no opportunity for real growth — personally, professionally, or athletically.
This is particularly true in the sport of hockey. Ice Skating is an unnatural act that takes years of practice. The athletes who demonstrate the greatest eagerness to abandon fear of injury at a young age will often be the athletes who have the fastest, most dynamic learning curve.
As a coach, I believe all activities should be made competitive, and exciting. Each drill or activity should have several different variables that incorporate several layers of instruction and practiced athleticism. For example... Who teaches crossovers by teaching kids to skate all 5 circles? Everyone does. It's a basic hockey drill. From mites on, kids start in the corners and skate the circles 3 players at a time. Forwards then backwards. Yet how many times in a game do you actually crossover for an entire 360 degrees? And isn't the most difficult part of the movement, not the crossover itself, but rather the transition from crossover left to crossover right... from crossover forward to a stop or tight turn.... the transition from crossover forward to backward skating. The 5 circles is a basic hockey drill that every bored coach does, and past Pee Wee's we as coaches need to ask ourselves what does it really do? Does it re-inforce bad habits and keep kids in their comfort zone? Or does it challenge them to think outside the box?
Try this idea. Use the helpful hints from this Youtube video from the Canadian Hockey Academy and incorporate them in what I call the "Peanut Drill"- http://www.youtube.com/watch?v=EZnfktIar_o
To perform the peanut drill, take 6 cones and place them in neutral ice in the shape of a peanut. The 4 end cones should be equally wide from one another, and the 2 inner cones should be narrow, about 5-7 feet apart. Your peanut can vary in size depending upon whether you are dealing with a team or in a private lesson environment. Divide your group in half, with half the group skating around the shape of the peanut (outside the wide end cones, and up inside the narrow inner cones), and the other half skating in the opposite direction in a wide crossover 5-10 feet outside the peanut. Instruct your players navigating the peanut that during the drill they should not have any traditional forward strides, and they should be able to generate speed off their edges, by continuously crossing over. On your whistle players will speed up. On 2 quick whistles they stop and change directions. 3 quick whistles they turn around into a back skate. Incorporate pucks to build skill upon skill, and have the groups switch after 3-5 minutes. During the switch demonstrate proper technique and drill down with demonstration what skills are being performed correctly.
Is this a more game-like activity? Does it force players to keep their head up, and multi-task skills? Yes. Is it easy to set up and teach? Absolutely.
On this blog, and through my website, I hope coaches of all levels and ability can have some insight into some of the principles that I have learned in my playing career and through my many years of coaching. Feel free to contact me anytime with questions and comments, as I will be frequently posting.
All the best,
Andrew Trimble
Subscribe to:
Posts (Atom)